No, you’re not crazy: photographing darker skin tones, like mine, is harder than photographing lighter ones. Before anyone goes and reports me for reverse racism, which isn’t a thing, lets talk about this in purely technical terms.
From the 1950s well into the 1980s, Kodak, the standard in film processing, provided photo labs with “Shirley cards,” photos meant to be used to calibrate skin tones and light levels for photo printing.
There were many “Shirleys” over the decades (the name came from the original model)—but as you might assume, they were all fair-skinned Caucasian women. So unless you processed your own images, they were developed to best complement light skin—no matter the skin tones or hues in your photos. Further, the dynamic range of Kodak film was biased toward lighter skin.
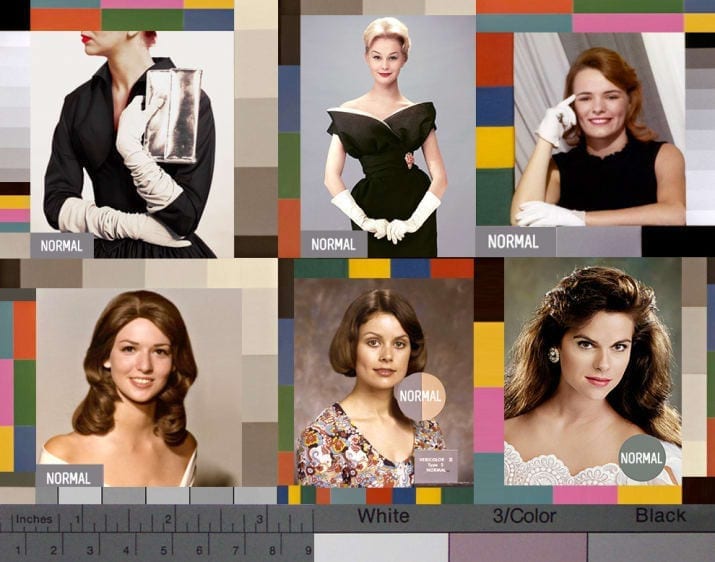
This created a situation in which photos of people with darker skin, especially photos with both lighter and darker skin tones in them, were very difficult to expose properly. In an NPR interview, photographer Syreeta McFadden explained, “A lot of [the design of film and motion technology] was conceived with the idea of the best representation of white people.
And I don’t mean to say that it was a deliberate and exclusionary practice, but [it was] much more of a willful obliviousness, if you will. So color film in its early stages pretty much developed around trying to measure the image against white skin.”
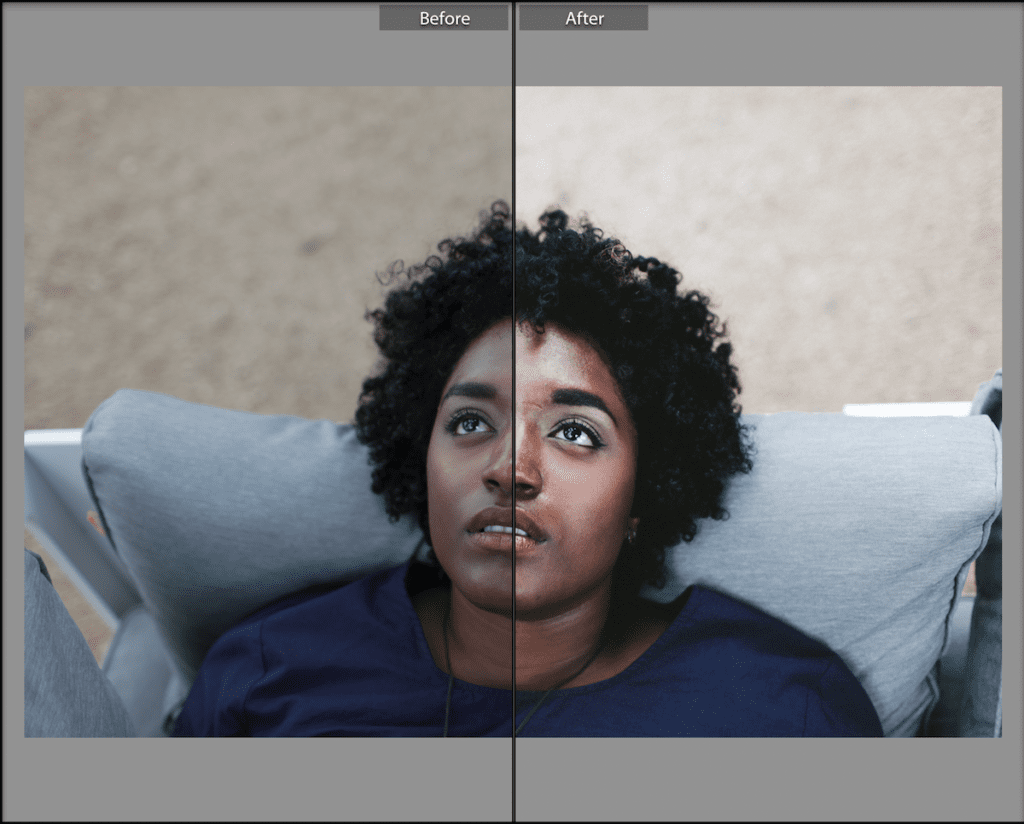
Thankfully, that is less of an issue now. Technology has gotten better (although there have been some problems along the way). Color film and digital color sensors don’t butcher darker skin tones anymore (hooray!), but we aren’t totally out of the woods yet. If, like me, you love to use older film presets or if you just want to photograph a range of subjects, you need to be cognizant of the default toward lighter skin and how to correct it.

With that in mind, a question remains: What is the best way to photograph darker skin tones? Like a softbox or a white wall, lighter skin picks up and reflects light rather easily. This helps photographers better capture it with low levels of flash or in low-wattage light. Darker skin, however, isn’t as reflective, so how you light your subjects and choose backgrounds must change, to consciously and successfully light people with darker skin.
TEN TIPS FOR PHOTOGRAPHING DARKER SKIN TONES
1. For a photo including people with different skin tones, place your primary light source closer to the subject with darker skin. Note that if you do this, you may have to burn a little in post to make sure the subjects with lighter skin aren’t too bright.
This isn’t to say that you should blow out their skin or use only one light source. If you are shooting outdoors, bring in a reflector or have your darker-skinned subject interact in closer proximity to the light source.

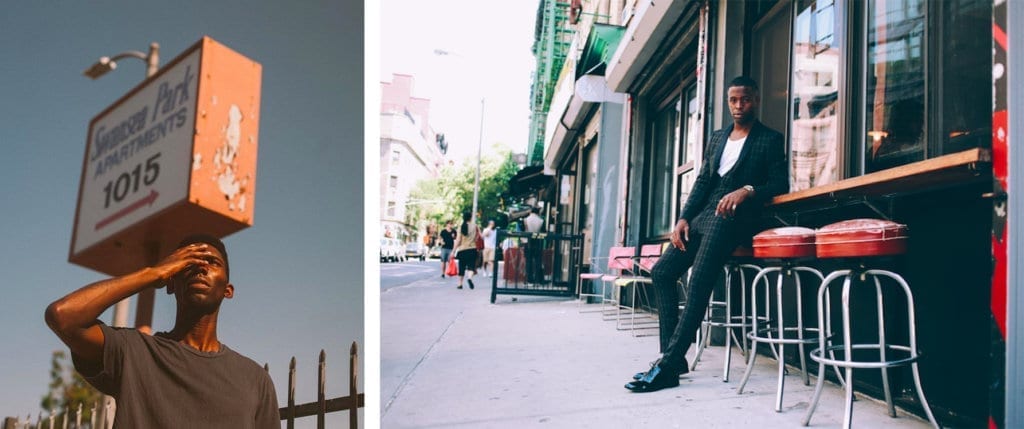
2. Be conscious of undertones. Darker skin has undertones, just like lighter ones do. As you choose environments for portraiture, look for complementary colors that work well with the undertones for a soothing portrait, or contrasting or clashing ones for a more provocative look.
For example: I leaned into Jihaari’s skin’s orange undertones by placing him in compositional opposition to a sign with similar colors (left photo). And you can see how the subtle inclusion of red in the setting of the photo on the right goes smoothly with Kelechi’s undertones.
3. Keep lighting off the walls for a more cinematic feel—you want to create depth with your imagery. Using varying stages of light allows you to have a more dynamic frame.
Use a hair light. Don’t rob your subjects of the complexity and detail in their hair by not lighting it properly. This makes sense for everyone whose hair is dark. Make sure your have light that appropriately frames your subject’s hair.
4. Use a hair light. Don’t rob your subjects of the complexity and detail in their hair by not lighting it properly. This makes sense for everyone whose hair is dark. Make sure your have light that appropriately frames your subject’s hair.
5. Embrace the beauty of a well-lit silhouette and how it drapes light around darker skin features.
This image (below) is a favorite of mine. In low light, I will often opt for a silhouette, using the strongest light to kiss the edges of someone’s visage. It gives an effect of mystery and grandeur.

6. Employ the Highlights slider in Adobe Photoshop Lightroom CC or Curves adjustments in Photoshop CC to create soft contrast across darker skin. Even light looks magical on darker skin tones; it provides tonality and detail.
7. Harsh light is more forgiving, yes, but reflective light is your best friend. Use that to your advantage. Bouncing light or using diffusers reveals the complexity of facial features.
8. Resist the urge to lighten someone up…. I’ll say it again for the folks in the back: Properly lighting dark skin is not the same as dodging dark skin in Photoshop.

9. If you have multiple skin tones, set the median and use Photoshop’s Dodge tool and Burn tool to help you out. This is something you want to employ only if you have just one light source—for instance, if you’re shooting outdoors and have no way to soften the light. If this is the case, shoot each subject properly exposed so you have a digital example of what their skin tone is like, and then use Photoshop to closely achieve that.
10. With skin tones in general, pay attention to the background you’re using. Don’t tuck darker-skinned subjects against dark backgrounds unless you’re going to light them separately.

As we slowly march to a more racially equitable future, it’s imperative that we know how to light various skin tones properly to give them the visibility they deserve. Study the work of artists who do a great job lighting various skin tones and where the light they use is coming from. That’s what helped me on my journey to being a better artist.
By Aundre Larrow
Photographs by Aundre Larrow. Visit his portfolio site to see more of his work


